Wednesday, May 20, 2009

Whole Lotta Loot

This past week found me helping clean out an old garage that started as a Texaco service station back in 1956. My uncle was aware of some of the treasures stashed away in this place, which has been in operation since '56, and under the same ownership for 30+ years. When he heard the EPA was cleaning up the place (translation: gonna demo it probably, and leave the soil "percolating" behind a chain-link fence, unused, for the next 30 years), he stopped in to see what the owner was doing with all the old tools and equipment, and came away with a few things. At my uncle's suggestion (it didn't take much), I stopped by, too, and spent about an hour and a half prowling through the place and set aside a few things.

Came back the next day (Saturday) to be joined by a couple of my Okie car friends who took nearly everything else, save for a piece or two I picked out before they arrived. It was, as you can expect, a bittersweet event: getting all kinds of cool stuff that hasn't seen the light of day in decades, but all the while knowing this man is being forced out of business, and the cool old steel building in which he did business will soon be gone...

While these pictures by no means cover all that I got, here's some snaps of the highlights:

Pair of Johnson adjustable tappet (lifter) wrenches (for the flathead)


Set of Ford valve guide remover tools; top to bottom: V-8 valve spring compressor; A & B (2); V-8; V-8 (by Plomb, #6521)


And some more Plomb tools


Pair of Model A axle housings, converted into axle stands, for Model A and early Ford V-8 era rear axles. At my friend's suggestion , I'm going to cut off the spring mounts and mount them on top of my 1939 axle housings, rather than use the Pete & Jake spring mounts. My friend has sneered at the P&J ones since he first saw them, and has continually suggested this solution, which he insisted guys did back then...maybe, but if it works and looks better, who cares? After I cut off the spring mounts, I can still use them as stands, so...


A VERY cool tach with an odometer(!). THIS is the solution to my speedometer/tachometer quandary that I was facing with the T, not to mention trying to find something that looked "period" (circa 1950 or so). Now I can run one gauge, driven off the speedo cable, and have an odometer, too. The stamping and numbering on the back lead me to believe this is Stewart-Warner, but no name appears on the case. This thing looks beautiful, PLUS it's got right angle drive!


And finally, for the pièce de résistance, a Sun 504 distributor tester and rolling cart. Complete with a giant Sun-labeled can of automotive spec sheets from 1964 to 1973 or so, AND all the adaptors, including those for magnetic pickup distributors, AND Ford flathead distributors!


To close out the photos, here's the back of the pickup with all my stuff, plus the United Motors Service sign my uncle got, but I delivered. (A small price to pay for the lead!)


I'll post more photos next week, when I pick up the last couple items, including a Snap-On battery charger.

Until then,

-30-

Tuesday, May 12, 2009

Checking Starters, Adjusting Lifters


Since the last post, I picked up my uncle's '50 starter to find (mildly disappointingly) that it has the exact same dimensions as my starter, and interferes with the flywheel/ring gear exactly the same. I'm beginning to suspect that the ring gear is not fully seated(?) on the flywheel. It appears to my eyes to be able to move forward (away from the Bendix, toward the front of the motor) about 3/32".

Also, I began adjusting the lifters, finding that 6 of the 8 intake lifters were within spec (.010"-.012"). Of those, most were .011". I adjusted two, pretty easily. I'll detail the "how" later with photos, but the 1939-48 Ford & Mercury Shop Manual for Trucks & Cars has a great how-to on turning the motor the fewest times to get all the lifters in position to set the clearance. Also, the Van Pelt flathead site (an awesome resource) has this section on removing stubborn old Ford flathead lifters.

All I can say is someone did a nice job when they rebuilt this motor. I've had to do very little on it so far...

-30-

Saturday, May 2, 2009

It's Always Something

Well, I've gotten a lot done since last posting.

Besides attending underground rock shows

visiting old steam locomotives

and B-17 bombers

I also picked up a set of circa 1942-45 Plomb combination wrenches

which helped sate a lust for these tools I mentioned in this post.

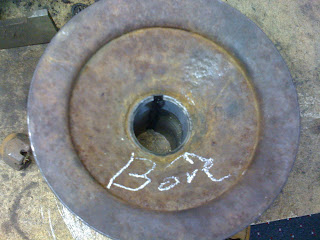
Meanwhile, on the hot rod front, I had the inside bore of my front pulley machined to fit (it was too snug before).

Once that was done, I was able to install the pulley and set the intake manifold and fan assembly on the motor to see if the pulleys all line up. Thankfully, they do.

Then, today my friend from Okieville stopped by unexpectedly, but gave me a hand on the motor. First, we checked the connecting rod bearings (well, one at least) to see if we could tell if the crankshaft is standard or has been turned (under standard measurement).

Since the insert bearing (as I apparently have an entire 8BA rotating assembly (crankshaft, connecting rods, and pistons) did not have a measurement number on it, we just recorded the part numbers on it for lookup later.

Let me tell you that flipping that motor over (upside down) on that flathead stand gave me the willies. All I could imagine was the mounting bolts stripping out of the block and dropping the motor onto the stand, floor, and me. My friend assured me it would be fine. It was.

He also showed me the timing marks on the crankshaft and timing gears.

I can't recall if I've written that this motor already has an aluminum timing gear. The more we dug into this motor today, the more my friend's convinced it'll be a real ugly duckling that will (hopefully) turn into a beautiful(ly tuned) swan. We'll see.

After checking the bearing, we installed the two "dog turd" front crankshaft seals into the timing cover and oil pan. (This is a new one).

I'd been soaking it in oil, on the advice of my flathead friends. What was to have been a few days amounted to a few months, but I can't believe that would affect anything. Then, we heroically struggled to install the timing cover and crank pulley. The pulley wouldn't slide into place because of the still-swollen front seal. Finally, we drove the pulley home with a BFH and driver.

Once the front was buttoned up, we removed the old and installed the new rear main seal (cork) (this is the old one)

and installed the oil pan. I'm so glad we flipped the motor over. Installing that heavy pan and the gaskets would have been very difficult with the motor right side up. Here are the results:

Front seal
Rear main seal
Scary upside down motor with oil pan installed
Finally, there's always something when combining disparate Ford parts into a hot rod, and here's today's. Following my friend's recommendation, I installed the starter so I wouldn't have to fool with it once the motor's in the frame. After some discussion as to whether the Bendix should be in or out, I installed it in the "out" (not against the flywheel) position. After tightening it up, I went to turn the motor over with a breaker bar on the front pulley, just for kicks. In doing so, however, the starter Bendix clashed with the flywheel with a "clang." Figuring I'd put the Bendix in the wrong position, and at my friend's urging, I continued to rotate the motor, but it continued to clang. Knowing something was wrong, we looked to see that, even in its fully "out" position, the Bendix was still meshing with the ring gear.

We futzed with it a little, but have come to the conclusion that, since I'm using a '49-'50 Merc flywheel, and have a '49-'53 rotating assembly, perhaps I now need to use a '49-'53 starter and/or Bendix to clear the ring gear. Oh, well, I'm going to borrow my uncle's '50 Ford starter to see what differences, if any, there are between his and mine.

Results in the next post.

-30-